-40%
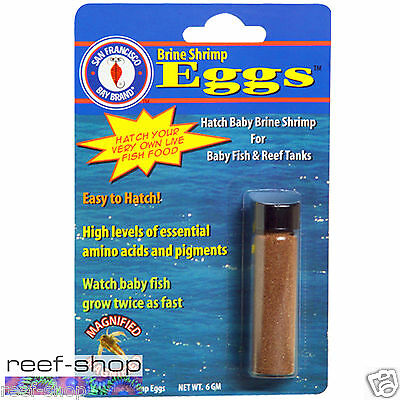
San Francisco Bay Brand Brine Shrimp Eggs 6 grams Easy Live Fish Food
$ 4.21
- Description
- Size Guide
Description
6 gram vial of Brine Shrimp EggsHatch baby brine shrimp the perfect food for baby fish and reef tanks. SF Bay Brand Brine Shrimp eggs come from a FDA certified solar salt ponds in the San Francisco Bay area. These ponds are known for being rich in flagellates and algae.
Recommended for: Baby fish and reef tanks.
Ingredients: San Francisco Bay brine shrimp eggs (Artemia franciscana), Magnesium sulfate, Sodium chloride.
Guaranteed Analysis: Crude Protein Min 55%
Crude Fat Min 18%
Crude Fiber Max 19% Moisture Max 95%
San Francisco Bay Brand Brine Shrimp Hatchery Tips
Freshly hatched brine shrimp eggs are one of the best foods available for fish fry, reef tanks and small aquatic organisms because they provide proteins and fatty acids which accelerate growth and increase survival. As you will soon discover, nothing stimulates the appetite of baby fish like baby brine shrimp!
• Use a cone! A cone or funnel shaped container is by far the best design for a brine shrimp hatchery. Glass juice containers and other household containers may work, but they aren’t nearly as convenient or as effective as the hatcheries available at your local pet shop or aquarium. For best results use the San Francisco Bay Brand Hatchery which uses an inverted one liter or larger soft drink plastic container. Although this is not exactly funnel shaped it does taper towards the bottom and provides many of the benefits of a funnel shape. Just make sure that the material that the container was made of is totally inert so as not to affect the hatching process. If the bottom of your hatchery is funnel shaped, the hatching process itself is enhanced and it will be easier to collect the nauplii once they hatch.
• Keep it clean! The cleaner you keep your hatchery the more likely your hatch will be successful, time and again. After each use, scrub your hatchery with a coarse nylon sponge and dilute household bleach. Don’t forget to rinse it with plenty of tap water.
• Don't over hatch Avoid the temptation to over hatch. In fact, you should never hatch more than 2.5 grams of eggs per liter of water. By using fewer eggs, a greater percentage of the eggs hatch which means you get more baby brine shrimp for your dollar.
• Watch the temperature! The rate of hatching brine is very sensitive to temperature. Most of your eggs should hatch in 24 hours if the temperature is roughly 82°F (28°C). If the temperature is only 70°F (21°C), you might have to wait up to 36 hours to get a good hatch. By increasing the temperature, you increase the rate of hatching. But be careful. As the temperature exceeds 86°F (30°C), you become more likely to loose the whole Hatch. Be safe- hatch between 82°-86°F (28°-30°C)!
• Salinity and pH Like Temperature the rate of hatching also depends on salinity and PH. The less salt in the water, the easier it is for brine shrimp to absorb enough water to burst through their protective shell. But, specific gravity should be at least 1.011 (15ppt) and can be as high as 1.030 (40ppt). This means that if you're Hatching in 1 quart, or liter, of ordinary tap water you should add somewhere between 1/2 and 2 level tablespoons of salt. The pH of the water should also be between 8.0 and 8.5. If your pH is below 8.0 your hatch rate will drop dramatically.
• Air and Lighting A continual source of aeration and good illumination increases the rate of hatching. Fluorescent lamps are best for the light source, but any 60-100 watt bulb placed a few inches from your hatch cone will work fine. Be cautious of any source of light, which might overheat your hatchery!
For best results use a San Francisco Bay Brand Hatchery or Shrimpery and San Francisco Bay Brand Hatch Mix or Eggs.
4 easy steps to hatching:
As we noted earlier San Francisco Bay Brand offers a Hatchery and Shrimpery which contain everything except the air pump (only the Hatchery requires an air pump) and water that you need. But if you want the challenge of putting together the material yourself, this is your parts list:
• San Francisco Bay Brand Brine Shrimp Eggs
• Hatch cone
• Aquarium rock salt
• Small air pump
• Baking soda
• Shrimp net
• Epson salt
• 60-100 watt lamp
1. Step 1: Hydrate
1. Set up your hatchery in a room that is between 70-86° F (21-30°C).
2. Position your source of light about 8 inches from your hatch cone
3. Fill the hatchery with 1 liter (about 1 quart) of tap water (or salt water if it’s readily available).
4. Place an airline inside the cone so that the opening nearly touches the bottom. Connect the other end to a small aquarium air pump. Adjust the airflow until you get a steady stream of bubbles that start at the very bottom and rise to the top.
5. Add 1 teaspoon of eggs (or the entire contents of one Hatch Mix packet.
6. Allow the eggs to soak up water (hydrate) for one hour before proceeding.
2. Step 2: Incubate
1. Continue to aerate and illuminate the hatchery.
2. Your finger or a spoon to push the ring of eggs (which tend to collect at the surface) back into the water.
3. Add salts:
a. Skip this step if:
▪ You are using our Hatch Mix Packets. The Hatch Mix contains all necessary salts.
▪ Or, if you used salt water instead of tap water in step 3, above.
b. Add 2 tablespoons of rock salt (non iodized salt) and ¼ teaspoon of Epson salt.
c. Or, add 2 tablespoons of any commercially available artificial seawater mix.
4. Add ¼ teaspoon baking soda, unless you are sure the PH is greater than 8.0.
5. Allow the eggs to incubate for 24 to 48 hours.
3. Step 3: Harvest and Feed Your Fish
1. Disconnect the airline at the end connected to the pump and move your light to the bottom of the cone. Brine shrimp nauplii are phototactic and will be attracted and will be attracted towards the light source.
2. Wait 5 to 10 minutes for the baby brine shrimp to swim to the bottom. Using the airline, siphon only the orange colored baby brine shrimp from the bottom of the cone into your shrimp net. Do not siphon the hatched shells which float at the surface.
3. Quickly and gently rinse the baby brine shrimp with tap water at your sink.
4. Feed each aquarium on as much as your fish can consume in a couple hours.
4. Step 4: Clean-Up
1. Scrub the cone with a sponge and diluted household bleach.
2. Rinse it well!
3. Tightly seal opened egg container to prevent
